In Firstpoint we have been using Azure virtual instances for a while now. If you just started using Azure, you probably will not have the issue that we have been facing, however if you have sized your disk properly.
Big disclaimer: use the procedure on your own risk! I’m not responsible if something breaks! The provided solution is as-is without warranty! Be warned.
When we deployed VMs in Azure, the default OS-disk was deployed as a 30GB disk. Now with Windows Server 2012, that does not leave much for other things. The Azure console (read: web GUI) does not provide any way to expand or shrink beyond the boundaries of your initial sized VHD file. People have then been forced to download the VHD file after having deleted the VM and the "disk". After the file have been downloaded, you have to use a VHD tool to increase the size of the VHD. Then you have to upload the file to Azure again, create a new VHD file based on the newly uploaded file and finally create a new VM which would use the new VHD-file. Time consuming and a lot of work.
Microsoft have as of April 2013 changed the deployment template to a 127GB boot partition (http://weblogs.asp.net/scottgu/archive/2013/04/16/windows-azure-general-availability-of-infrastructure-as-a-service-iaas.aspx).
The solution is based upon this blogpost: http://blog.maartenballiauw.be/post/2013/01/07/Tales-from-the-trenches-resizing-a-Windows-Azure-virtual-disk-the-smooth-way.aspx
Mr Balliauw from the link above has create a utility were you don't need to download/upload the VHD file to increase/shrink it. Pretty sweet stuff. I have downloaded his REPRO on GitHUB (https://github.com/maartenba/WindowsAzureDiskResizer). You will need visual studio to compile it after having resolved all the NuGet packages.
Off we go then. I have this VM in Azure:

The VM only have one disk of type OS disk. Browse to storage, select your storage account, the container where your VHDs are stored, the VHD-disk file and click the Edit BLOB button on the bottom:

When you click the Edit BLOB button this screen should show:

As you can see the disk size is 110 GB (I have shrinked it from 127GB which is the maximum size on Azure).
Next we have to power down the VM. Do a proper shutdown from the operating system and then a shutdown in the Azure web-console. When the status is updated with "Stopped (Deallocated)" you are ready to proceed. Make sure you select the Deallocated VM and press the Delete button:

When the delete job finishes, we need to go to the "Disks" tab, select the disk of the deallocated VM and press the Delete button. Please make sure you select "Retain the associated VHD"!!!

Next step is to download the repro from GitHUB, please see the link posted above. Resolve the NuGet packages in Visual Studio and build the solution.
Open up a new command window and browse to the location of your project. Try and run the console application and it should print the "how-to-use" help content:

Time to gather up some input data for the console application.
First one is easy. Determine the new size of the disk. I will set this to 120GB (remember 127 is the maximum for OS-disks in Azure). Next we have to find the bloburl. Navigate to storage, your storage account, the container for your VHDs. The file listing there should give you the file's URL. Next is the account name and the key. The account name is found under Storage:

There you will also find the access key "Manage access keys" button on the bottom.
Running the command:

Just in case you are wondering, no that is not my access key or my accountname :-).
Good, everything looks okay. Going back to the Azure console, let's edit the blob and check out the details:

Nice, that saved me some time compared to download of 110GB and then uploading 120GB again :-)
Now we need to create a new disk. Please navigate to Virtual machine in the console and choose new disk:

Give the disk a name, chose the VHD by browsing the container of your VHDs and check the option "VHD contains an operating system":

The disk should appear in the disks list under Virtual Machines. Now you are ready to create a new VM using this new disk as the "template".
Create a new VM:

Select the newly re-sized disk:

That's is, your VM will be deployed using the "new" disk.
And then the disclaimer:
Big disclaimer: use the procedure on your own risk! I’m not responsible if something breaks! The provided solution is as-is without warranty! Be warned.
Big disclaimer: use the procedure on your own risk! I’m not responsible if something breaks! The provided solution is as-is without warranty! Be warned.
Background
When we deployed VMs in Azure, the default OS-disk was deployed as a 30GB disk. Now with Windows Server 2012, that does not leave much for other things. The Azure console (read: web GUI) does not provide any way to expand or shrink beyond the boundaries of your initial sized VHD file. People have then been forced to download the VHD file after having deleted the VM and the "disk". After the file have been downloaded, you have to use a VHD tool to increase the size of the VHD. Then you have to upload the file to Azure again, create a new VHD file based on the newly uploaded file and finally create a new VM which would use the new VHD-file. Time consuming and a lot of work.
Microsoft have as of April 2013 changed the deployment template to a 127GB boot partition (http://weblogs.asp.net/scottgu/archive/2013/04/16/windows-azure-general-availability-of-infrastructure-as-a-service-iaas.aspx).
Resolution
The solution is based upon this blogpost: http://blog.maartenballiauw.be/post/2013/01/07/Tales-from-the-trenches-resizing-a-Windows-Azure-virtual-disk-the-smooth-way.aspx
Mr Balliauw from the link above has create a utility were you don't need to download/upload the VHD file to increase/shrink it. Pretty sweet stuff. I have downloaded his REPRO on GitHUB (https://github.com/maartenba/WindowsAzureDiskResizer). You will need visual studio to compile it after having resolved all the NuGet packages.
Off we go then. I have this VM in Azure:

The VM only have one disk of type OS disk. Browse to storage, select your storage account, the container where your VHDs are stored, the VHD-disk file and click the Edit BLOB button on the bottom:

When you click the Edit BLOB button this screen should show:

As you can see the disk size is 110 GB (I have shrinked it from 127GB which is the maximum size on Azure).
Next we have to power down the VM. Do a proper shutdown from the operating system and then a shutdown in the Azure web-console. When the status is updated with "Stopped (Deallocated)" you are ready to proceed. Make sure you select the Deallocated VM and press the Delete button:

When the delete job finishes, we need to go to the "Disks" tab, select the disk of the deallocated VM and press the Delete button. Please make sure you select "Retain the associated VHD"!!!

Next step is to download the repro from GitHUB, please see the link posted above. Resolve the NuGet packages in Visual Studio and build the solution.
Open up a new command window and browse to the location of your project. Try and run the console application and it should print the "how-to-use" help content:

Time to gather up some input data for the console application.
First one is easy. Determine the new size of the disk. I will set this to 120GB (remember 127 is the maximum for OS-disks in Azure). Next we have to find the bloburl. Navigate to storage, your storage account, the container for your VHDs. The file listing there should give you the file's URL. Next is the account name and the key. The account name is found under Storage:

There you will also find the access key "Manage access keys" button on the bottom.
Running the command:

Just in case you are wondering, no that is not my access key or my accountname :-).
Good, everything looks okay. Going back to the Azure console, let's edit the blob and check out the details:
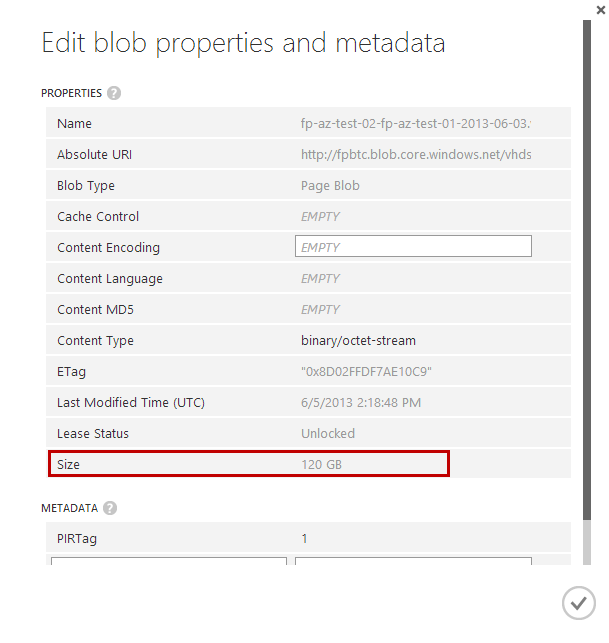
Nice, that saved me some time compared to download of 110GB and then uploading 120GB again :-)
Now we need to create a new disk. Please navigate to Virtual machine in the console and choose new disk:

Give the disk a name, chose the VHD by browsing the container of your VHDs and check the option "VHD contains an operating system":

The disk should appear in the disks list under Virtual Machines. Now you are ready to create a new VM using this new disk as the "template".
Create a new VM:

Select the newly re-sized disk:

That's is, your VM will be deployed using the "new" disk.
And then the disclaimer:
Big disclaimer: use the procedure on your own risk! I’m not responsible if something breaks! The provided solution is as-is without warranty! Be warned.
Thank you! It has been really helpful!
ReplyDelete